How To Take A Bearing Using A Compass
Taking A Compass Bearing From The Map
Navigating with a compass is easy with practise. Follow the tips in these steps to successfully take a bearing using a compass. you will see how to walk on a bearing at the bottom of the page. You will find images and more details below. First learn a little about the parts of a compass below.
This example will not deal with ‘Magnetic Declination’ Learn about Magnetic Declination on this page.
Learn about taking a grid reference in Ireland on this page.
Learn about using a romer scale in Ireland here.
Parts of a Compass

- Base Plate
- Lines Parallel to long edge of Base Plate
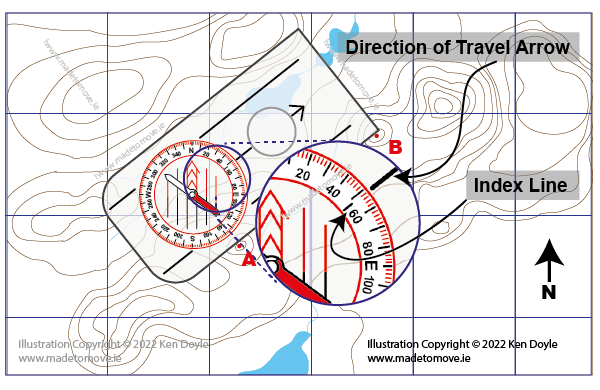
- Direction of Travel Arrow
- Magnifying Glass
- Ruler
- Red North Arrow/Orienting Arrow
- Magnetic Needle. Red points to Magnetic North
- Orienting Lines. Red North. Black South
- NSEW, Cardinal Points and Degrees
- Circular Bezel or Housing
- Index Line
- Romer Scales
The Circular Bezel 10 rotates.
The Orienting Lines 8, the NSEW / Degrees 9 and the Red North Arrow/Orienting Arrow 6 rotate with the Bezel.
The Red Magnetic Compass Needle 7 is ‘free floating’ and points to Magnetic North
The Index Line 11 does not move and stays in line with the Direction of Travel Arrow 3.
What is a bearing?

A bearing is the angle measured between North on the map and your planned direction of travel.
From ‘A’ to ‘B’ is the Direction of Travel.
The Bearing is the angle X˚ between the Direction of Travel line and a line pointing from ‘A’ along or parallel to Grid North on the map.
Taking a compass bearing from the map: Step by Step
- Identify where you want to start. Point ‘A’ and where you want to go. Point ‘B’.
- Identify ‘North’ or the ‘Top’ of the map. (The letters in town names and peaks will be running Left to Right or West – East)
- Identify the ‘Direction of Travel Arrow’ on the compass.
- Line up the long edge of the compass from point ‘A’ to point ‘B’. You may also use any clear line running along the length of the compass.
- Make sure that the ‘Direction Of Travel Arrow’ is pointing in the same direction as your journey, from ‘A’ to ‘B’.
- Identify the Red North Arrow/Orienting Arrow on the Compass Housing. It points to ‘N’ on the housing. (Not the magnetic needle, that is a different ‘arrow’)
- Rotate the Compass Housing until the Red North Arrow/Orienting Arrow points to ‘North’ or the ‘Top’ of the map. It lines up with the lines on the map called the Map Grid, pointing North on the Map.
- Read your ‘Bearing’ at the ‘Index Line’ (end of the ‘Direction of Travel Arrow at the Compass Housing’).
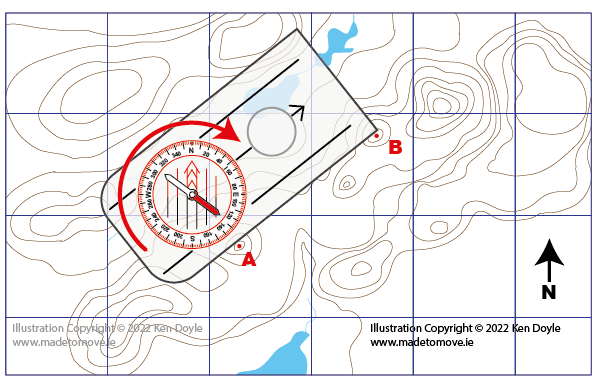
Taking a compass bearing from the map: Step 1

On your map, identify the two points ‘A’ and ‘B’.
‘A’ is where you are, ‘B’ is where you want to go to.
Line the long edge of the base plate or one of the long parallel lines up between ‘A’ and ‘B’.
IMPORTANT: Point the direction of travel arrow on the compass in the same direction as from ‘A’ to ‘B’.
Hold the map and compass together firmly.
Taking a compass bearing from the map: Step 2
Keep the compass lined up between ‘A’ and ‘B’.
Gently rotate the Circular Bezel (Housing) until the Orienting Lines on the Bezel are parallel with the grid lines running South to North on the map.
Ensure that the Orienting Arrow on the Bezel is pointing to Grid North marked on your map.
You have now set the bearing. You can remove the compass from the map.
The free floating Magnetic Compass Needle is not used in this part of the process and can be ignored
Taking a compass bearing from the map: Step 3
How to walk on a compass bearing

The bearing of 52˚ is now set on the compass. Be careful not to rotate or move the bezel
Hold the compass level.
The red end of the free floating Magnetic Needle points north.
Now slowly rotate the entire compass until the Magnetic Needle is sitting directly on top of the red end of the red orienting arrow on the bezel.
This is sometimes called ‘Red on Red’
The Direction of Travel Arrow now points at 52˚. Walk in the direction the arrow points and you will be walking on a bearing of 52˚ from ‘A’ towards ‘B’
This example will not deal with ‘Magnetic Declination’ Learn about Magnetic Declination on this page.
Learn about taking a grid reference in Ireland on this page.
Learn about using a romer scale in Ireland here.